THE BRIEFING
60-second read before you dive in:
Most solo founders build their AI stack backwards.
They start with the tool everyone is talking about. Then they add another one because a newsletter recommended it. Then another because it was on sale. Six months later they have a collection of subscriptions and no system connecting them.
Building a stack is not shopping. It is engineering. You are designing an operating layer for a one-person business, and the order in which you build it matters as much as the tools you choose.
This guide walks you through the exact sequence. Start here. Build in order. End up with a stack that actually works together.
Before You Build Anything: The One Question That Changes Everything
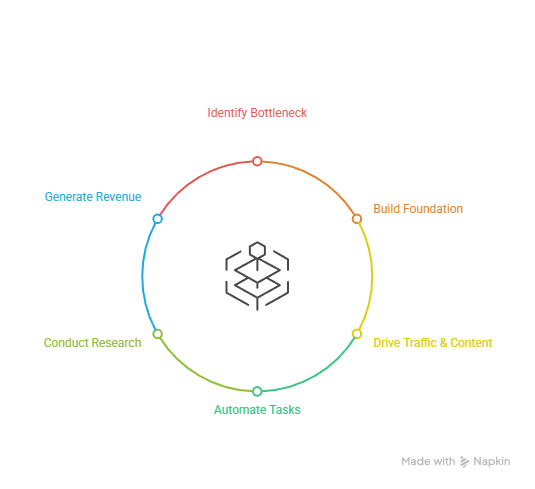
Before you sign up for a single tool, answer this question honestly:
What is the one thing that is most limiting your business right now?
Not the most exciting thing to fix. Not the thing everyone else is talking about. The actual bottleneck. The thing that, if removed, would move everything else forward.
Your answer determines where you start building.
Nobody can find you? Start with Traffic AI. You can not produce content consistently? Start with Content AI. You are drowning in manual repetitive tasks? Start with Automation AI. Your decisions feel uninformed? Start with Research AI. You have traffic but no way to capture or convert it? Start with Revenue AI.
Pick your bottleneck. That is layer one. Everything else waits.
Step 1: Set Up Your Foundation Tools First
Before any category-specific tools, two things go in before anything else. They are free, they are non-negotiable, and they support every other layer you build.
Google Search Console
Go to search.google.com/search-console. Add your site. Verify ownership. Done. This starts the clock on Google indexing your content. Every day you delay is a day of data you will never get back.
Setup time: 15 minutes.
RankMath SEO (WordPress only)
Install RankMath from the WordPress plugin directory. Run through the setup wizard. Connect it to Google Search Console. This is your on-page SEO guide for every article you publish going forward.
Setup time: 20 minutes.
These two tools cost nothing and create the infrastructure everything else builds on. Do not skip them.
Step 2: Build Your Traffic Layer
With the foundation in place, Traffic AI is the next priority for most solo founders. Content without traffic is a tree falling in an empty forest.
The free start: RankMath plus Google Search Console
You already have these from Step 1. Use RankMath to optimize every piece of content you publish. Use Search Console to monitor what is working and what is not.
The paid upgrade: Surfer SEO at $29 per month
When you are publishing consistently and want data-driven content briefs that tell you exactly what a piece needs to rank, Surfer SEO is the upgrade. It analyzes what is already ranking for your target keyword and gives you a checklist to compete.
Add this when you have a publishing cadence established and you are ready to get serious about SEO.
Traffic AI build time: 35 minutes to set up the free layer.
Step 3: Build Your Content Layer
Traffic brings people to your content. Content AI is what they find when they arrive, and it determines whether they stay, click, and come back.
The free start: ChatGPT free tier plus Napkin.ai
Use ChatGPT to draft outlines, brainstorm angles, and accelerate your writing process. Use Napkin.ai to turn finished articles into shareable infographics automatically. Both are free and both produce immediate results.
The paid upgrade: Writesonic at $19 per month
When the free tier limits start slowing your publishing cadence, Writesonic removes the ceiling. Feed it a brief and a keyword, get a working draft, refine it into something worth publishing.
The goal is two to three articles per week. If you can hit that on the free tier, stay free. When you cannot, upgrade.
Content AI build time: 10 minutes to set up free tools. First draft in your first session.
Step 4: Build Your Automation Layer
This is where one person starts to feel like a team.
Automation AI connects everything else in your stack. It handles the tasks that do not require a human decision but do require human time if left unautomated. New subscriber triggers a welcome sequence. New article published pings a notification. Data moves between apps without anyone touching it.
The free start: Make.com free tier
Make.com’s free plan gives you 1,000 operations per month. Start with one automation. Something simple. A form submission that sends you a notification, or a new WordPress post that logs to a Google Sheet.
Learn how Make thinks. Then build the next automation. Then the next one.
The paid upgrade: Make.com Core at $9 per month
When your free operations run out before the month ends, upgrade. At $9 per month for 10,000 operations it is the easiest upgrade decision in the stack. It is also the highest leverage dollar you will spend.
Start building with Make.com here
Automation AI build time: 30 minutes to set up your first scenario. First automation running same day.
Step 5: Build Your Research Layer
Good decisions require good information. Research AI cuts the time between a question and a reliable answer from forty minutes to two.
The free start: Perplexity AI free tier
Go to perplexity.ai. Start using it instead of Google for research tasks. Ask it questions in plain language. Get synthesized answers with cited sources. Verify the important ones. Move on.
For a solo founder who needs to stay sharp across their industry, their competitors, and their tools, Perplexity is the highest-value free tool in the stack.
The paid upgrade: Perplexity Pro at $20 per month
When you hit the daily Pro search limits consistently, upgrade. The Pro plan unlocks higher usage limits and access to more powerful models for complex research tasks.
Stay free until you hit the ceiling. The ceiling arriving means your research habit is working.
Research AI build time: Zero. Go to perplexity.ai and start using it right now.
Step 6: Build Your Revenue Layer
Traffic without capture is borrowed attention. The Revenue layer turns visitors into subscribers, subscribers into customers, and customers into recurring revenue.
The free start: MailerLite free tier
MailerLite’s free plan supports up to 1,000 subscribers with full automation capability. Set up your account. Create a simple signup form. Install it on your site. Write a welcome email that goes out automatically when someone subscribes.
That is your Revenue layer. Running. Free. Day one.
The paid upgrade: MailerLite paid plans start at $9 per month
When your list crosses 1,000 subscribers you upgrade. That is a good problem to have and the revenue your list generates by that point will more than cover the cost.
Revenue AI build time: 45 minutes to set up MailerLite, create a form, and write a welcome email.
Your Complete Build Sequence
Here is the full sequence in order:
Day 1: Google Search Console plus RankMath. Foundation locked in.
Day 2: ChatGPT free tier plus Napkin.ai. Content layer ready.
Day 3: Make.com free tier. First automation running.
Day 4: Perplexity AI. Research layer active.
Day 5: MailerLite. Revenue layer live.
Five days. Five layers. A complete Solo Scale Stack running at zero cost.
From there you publish, you learn what is working, and you upgrade the layer that is limiting you first.
The Most Common Mistake: Building Too Much Too Fast
The temptation when you discover a framework like this is to build all five layers simultaneously. Spend a weekend setting everything up, integrating everything together, optimizing everything before you have published a single piece of content.
Resist it.
Build one layer. Use it. Publish something. See what happens. Then build the next layer.
A stack you are actually using beats a perfect stack you built but never deployed. Every time.
What Comes After the Stack Is Built
The stack is not the destination. It is the infrastructure.
Once all five layers are running, the work is publishing consistently, monitoring what drives traffic and affiliate clicks, doubling down on what works, and gradually automating more of the process so your output increases without your hours increasing.
That is how one person builds something that scales.
Start with the bottleneck. Build in order. Stay consistent through the quiet period before the compounding kicks in.
That is the move. Let the big dog eat.
Solo Stack Tools || What is the Solo Scale Stack || Free AI Tools
Want the full tool breakdown for each category? Read the complete Solo Scale Stack guide. Or subscribe below for weekly stack updates and workflow guides.